Joao Alves
Senior Engineering Manager at IndeedFlex
Firebase Android Playground — Authentication

Index:
- Firebase Android Playground — setting up and Analytics
- Firebase Android Playground — Authentication
- Firebase Android Playground — Realtime Database
- Firebase Android Playground — Cloud Messaging
Hello there, welcome to article number 2 on the series. In the last article we did the initial setup of the project and added Analytics to it by logging some test events. In this one, we’ll look into Firebase Authentication and see how easy it is to authenticate your users in several different ways with the help of the available SDKs.
Firebase Authentication gives us a lot of possibilities when speaking of ways to authenticate our users. We can setup regular email/password authentication, phone, and then we can also integrate with the most common identity providers, so the users can login with their Google, Facebook, Twitter or Github accounts for example. You can as well connect an existing sign-in system to the Firebase Authentication SDK and get access to the other Firebase services without having to rewrite all your existing authentication system.
And Firebase also supports anonymous auth, what does this mean? You can create a temporary anonymous account for the users of your app and then when and if they decide they want to signup, their account just becomes a regular account and the user can keep whatever state or data he had stored before anonymously.
Firebase UI Auth vs SDK
We now know what Firebase offers us in terms of features/functionality regarding authentication, now we need to look at the 2 different ways of using and building our authentication system with that offering. Firebase provides us with 2 main options to build our authentication system, let’s quickly look at them:
FirebaseUI Auth: this is the recommended (or at least quickest) way to add a complete sign-in system to your app. As the name suggests, this is a UI ready component that can be customised and allows users to sign in with all the mentioned services above. The official docs describe this as a Drop-in Authentication Solution.
Firebase SDK Authentication: this as the name suggests consists in using the Firebase Auth SDK to build our own authentication system. As expected, the SDK provides APIs to handle all types of sign in mentioned but when going with this approach we need to build all the UI and manage all the edge cases ourselves. If we want to use the anonymous auth feature we need to use the SDK at least for that step.
Let’s build something
Now that we know what Firebase offers us and how we can build it, let’s go ahead and do it. In today’s article we’ll focus on building an authentication system for our app that will allow users to sign in using email/password, their phone number or their Google account (leaving the other providers out for brevity). We’ll use the FirebaseUI Auth approach as this gives us a ready to use solution, tested and with all the edge cases covered, all we need to do is integrate it in our app.
As usual, dependencies come first. We need to add the FirebaseUI Auth and Firebase Auth dependencies to our project, so let’s add the following lines to our application level build.gradle and re-sync gradle:
implementation 'com.firebaseui:firebase-ui-auth:4.2.0'
implementation 'com.google.firebase:firebase-auth:16.0.1'
The second dependency is required to use the phone authentication provider. Now we just need to go to the Firebase console and enable the sign in methods we want to support. In the console go to the Auth tab, click on set up signing method and pick the providers you want to support. As mentioned before, in this example we’ll support email/password, phone and Google sign in, just go ahead and enable them.
Authenticate user
And finally to the code. For this example we’re adding another button in our HomeActivity to trigger the authentication flow. We’re also creating a new AuthenticatedUserActivity for where we’ll navigate if the user is already signed in or after completing the sign in. In this activity we’ll see as well how to sign out and delete the user account. But starting with the MainActivity code:
class MainActivity : AppCompatActivity() {

    private val providers = arrayListOf(
        AuthUI.IdpConfig.EmailBuilder().build(),
        AuthUI.IdpConfig.PhoneBuilder().build(),
        AuthUI.IdpConfig.GoogleBuilder().build())

    override fun onCreate(savedInstanceState: Bundle?) {
        super.onCreate(savedInstanceState)
        setContentView(R.layout.activity_main)

        button_analytics.setOnClickListener {
            startActivity(Intent(this@MainActivity,
            	AnalyticsActivity::class.java))
        }

        button_auth.setOnClickListener {
            if (FirebaseAuth.getInstance().currentUser != null) {
                startActivity(Intent(this@MainActivity,
                	AuthenticatedUserActivity::class.java))
            } else {
                startActivityForResult(
                    AuthUI.getInstance()
                        .createSignInIntentBuilder()
                        .setAvailableProviders(providers)
                        .build(),
                    REQUEST_CODE_SIGN_IN)
            }
        }
    }

    override fun onActivityResult(
    	requestCode: Int,
    	resultCode: Int,
    	data: Intent?
	) {
        super.onActivityResult(requestCode, resultCode, data)
        if (requestCode == REQUEST_CODE_SIGN_IN) {
            if (resultCode == Activity.RESULT_OK) {
                // Successfully signed in
                startActivity(Intent(this@MainActivity,
                	AuthenticatedUserActivity::class.java))
            } else {
                Toast.makeText(this, "Failed to sign in",
                	Toast.LENGTH_SHORT).show()
            }
        }
    }

    companion object {
        private const val REQUEST_CODE_SIGN_IN = 1234
    }
}
Quite simple, right? As mentioned, the first thing we do on our authentication button click listener, is checking if we have a current user and if we do we navigate to the authenticated screen straight away. If not, we simply start an activity for result passing a sign in intent we create using the providers defined on the top of the class (these match the types of sign in we want to support). And that’s it, this all we need to initiate the authentication flow. Then we just need to override the onActivityResult method to get the results from the sign in flow and either navigate to AuthenticatedActivity in case of success or just show a toast otherwise.
Let’s see how the UI provided by Firebase looks like for the phone and email/password flows. The Google sign in flow uses the default Google authentication already existing in the Android system so left it out for brevity:
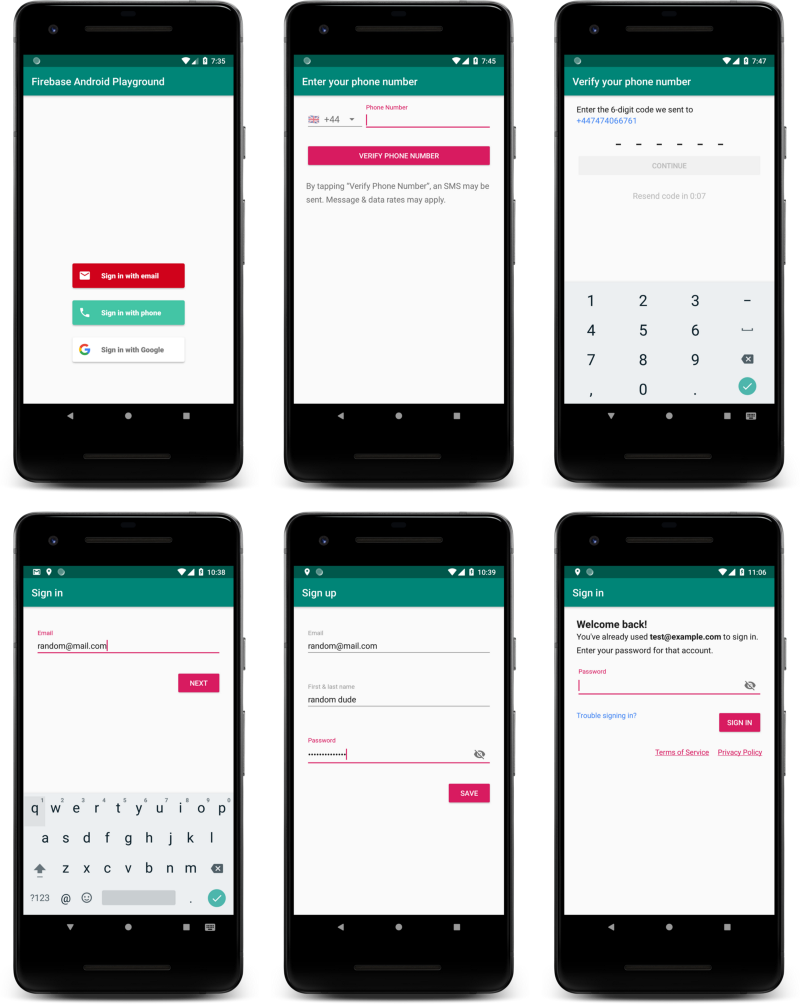
Quite a simple UI that by default already respects the app theme so it doesn’t look too off and it can be easily seen as part of the app itself. We can add some customisations on the initial screen, let’s go ahead and add an Android logo above the buttons and add some links for terms and privacy policy. All we need to do is update our intent creation with couple of new lines, like this:
startActivityForResult(
    AuthUI.getInstance()
        .createSignInIntentBuilder()
        .setAvailableProviders(providers)
        .setLogo(R.drawable.ic_android_robot)
        .setTosAndPrivacyPolicyUrls("https://medium.com/@jcmsalves",
            "https://github.com/jcmsalves")
        .build(),
    REQUEST_CODE_SIGN_IN)
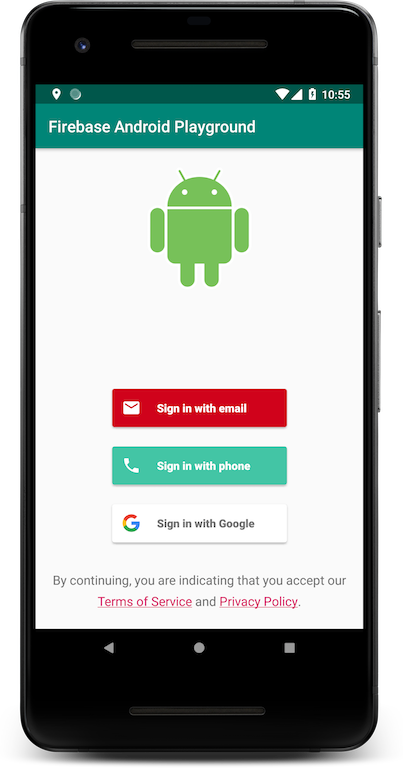
Super easy, we just pass a drawable resource into the setLogo() function and a couple of URLs into the setTosAndPrivacyPolicyUrls() function. And this is how our authentication screen looks like now:
Even better looking. Now that we have our UI and our code ready let’s go ahead and create some users. I created one user with each of the methods, let’s see how they show up in the Firebase console in the Auth tab:
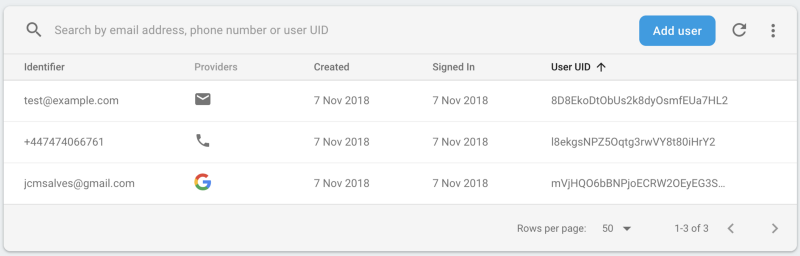
Pretty cool, we have all our users registered as expected.
Sign out and delete account
So, assuming we have one of our users from above signed in, if we open the app now and try to start the authentication flow the user should be taken directly to our newly created AuthenticatedActivity and this is what they’ll see:
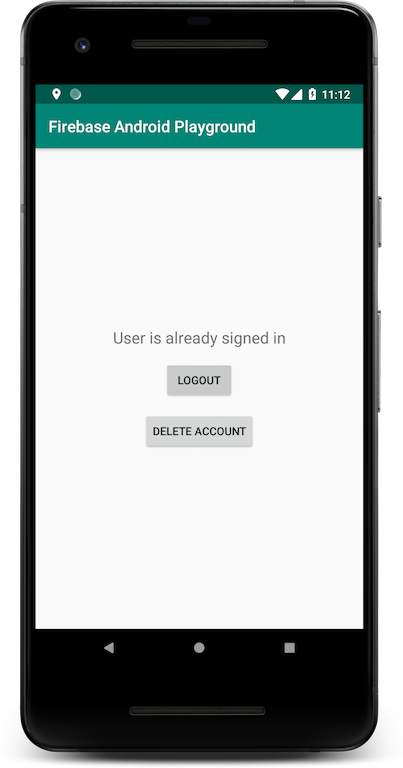
A very basic UI just to represent the signed in status and as mentioned before we’ll be looking at sign out and delete account user here, so we have those 2 buttons on the screen. Let’s see the code:
class AuthenticatedUserActivity : AppCompatActivity() {

    override fun onCreate(savedInstanceState: Bundle?) {
        super.onCreate(savedInstanceState)
        setContentView(R.layout.activity_authenticated_user)

        button_logout.setOnClickListener { _ ->
            AuthUI.getInstance()
                .signOut(this)
                .addOnCompleteListener {
                    Toast.makeText(this, "User signed out",
                    	Toast.LENGTH_SHORT).show()
                    finish()
                }
        }

        button_delete_account.setOnClickListener { _ ->
            AuthUI.getInstance()
                .delete(this)
                .addOnCompleteListener {
                    Toast.makeText(this, "User account deleted",
                    	Toast.LENGTH_SHORT).show()
                    finish()
                }
        }
    }
}
Firebase Auth provides a very simple onCompleteListener for both cases as we can see in the code above. For this is example we’ll just display a toast and finish the current activity so the user is taken back to the MainActivity. To verify the account deletion we need to open the Firebase console again and verify that our user is now deleted.
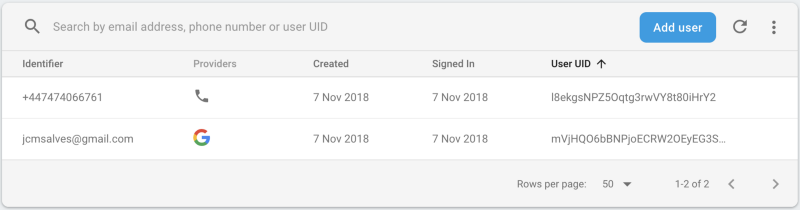
As we can see our email user was deleted. If we try to sign with similar credentials it will look that were just signing back in as there are no errors, just a little welcome message when using the email/password flow. In reality, Firebase is just creating a new account with the same credentials but whatever was part of the previous account will be lost.
I didn’t mention before but we can see in the image above that it is possible to create users in the Firebase console. An email and password have to be provided in order to do so.
And that’s it we’re done for today, we are now authenticated and ready to go. We built a complete authentication setup for our app and we’re ready for the next phase on the series. Hope you enjoyed the article and if you did, please don’t forget to give some 👏and see you in a couple of weeks for a dive on Firebase Data Storage 👋.
Firebase Android Playground — setting up and Analytics ⇦ PREVIOUS
NEXT ⇨ Firebase Android Playground — Realtime Database