Joao Alves
Senior Engineering Manager at IndeedFlex
Android and Kotlin — basic Hello World

Here we go everyone, first article in the series. Let’s start this Android Kotlin journey, and what better place than the starting point right? This article will cover the creation of a very simple Hello World Android Project with Kotlin.
This will be very similar to create a base Android project with Java just clicking a couple of different buttons and getting a Kotlin project instead in the end.
In order to use Kotlin properly, we should use Android Studio 3. It works with lower versions but you need to add a plugin. AS3 has full support and it’s now in stable release so you should probably use it anyway. You can download the latest version here:
Download Android Studio and SDK Tools | Android Studio
So let’s create our new project. As usual, open Android Studio and pick the Start a new Android Studio project from the welcome screen or just go to File -> New -> New Project
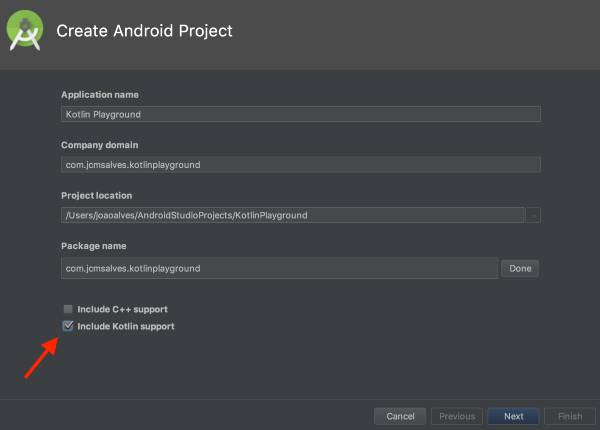
Then fill in all these details and don’t forget to tick the Include Kotlin support option in the bottom. This will create a base project with Kotlin instead of Java. Click next and in the remaining screens you can leave the default values on as it’s what’s we’re going to be using in this article.
And we’re good to go, we just created a basic Hello World app with Kotlin. Let’s check some files and see what’s different. If we look at both the Project and app module build.gradle files we can see that Android Studio automatically added the Kotlin dependencies we need.
Project build.gradle:
buildscript {
    ext.kotlin_version = '1.1.51'
    repositories {
        google()
        jcenter()
    }
    dependencies {
        classpath 'com.android.tools.build:gradle:3.0.1'
        classpath "org.jetbrains.kotlin:kotlin-gradle-plugin:$kotlin_version"
    }
}
...
App build.gradle:
apply plugin: 'com.android.application'
apply plugin: 'kotlin-android'
apply plugin: 'kotlin-android-extensions'

...

dependencies {
    implementation fileTree(dir: 'libs', include: ['*.jar'])
    implementation"org.jetbrains.kotlin:kotlin-stdlib-jre7:$kotlin_version"
    ...
}
So with the Kotlin dependencies sorted for us by Android Studio we can look at some code. Let’s see how our basic MainActivity looks like in Kotlin.
class MainActivity : AppCompatActivity() {

    override fun onCreate(savedInstanceState: Bundle?) {
        super.onCreate(savedInstanceState)
        setContentView(R.layout.activity_main)
    }
}
Pretty much the same as in Java with just some specific Kotlin syntax in the class and method declaration. This doesn’t give us much so let’s add a few things and actually see some Kotlin in action.
Let’s add a button to our layout that will change the welcome text view from Hello World to something more relevant to our context. We also need to add an id to the existing text view. The activity_main.xml should now look like this:
<?xml version="1.0" encoding="utf-8"?>
<android.support.constraint.ConstraintLayout xmlns:android="http://schemas.android.com/apk/res/android"
    xmlns:app="http://schemas.android.com/apk/res-auto"
    xmlns:tools="http://schemas.android.com/tools"
    android:layout_width="match_parent"
    android:layout_height="match_parent"
    tools:context="com.jcmsalves.kotlinplayground.MainActivity">

    <TextView
        android:id="@+id/welcomeTextView"
        android:layout_width="wrap_content"
        android:layout_height="wrap_content"
        android:text="Hello World!"
        app:layout_constraintBottom_toBottomOf="parent"
        app:layout_constraintLeft_toLeftOf="parent"
        app:layout_constraintRight_toRightOf="parent"
        app:layout_constraintTop_toTopOf="parent" />

    <Button
        android:id="@+id/updateTextButton"
        android:layout_width="wrap_content"
        android:layout_height="wrap_content"
        android:text="Update welcome message"
        app:layout_constraintLeft_toLeftOf="parent"
        app:layout_constraintRight_toRightOf="parent"
        app:layout_constraintTop_toTopOf="@id/welcomeTextView"
        app:layout_constraintBottom_toBottomOf="parent" />

</android.support.constraint.ConstraintLayout>
Now we need to access those views in our MainActivity so we can actually update the text when the button is clicked. This is where you would either use findViewById() or something like ButterKnife to bind the views. Well with Kotlin you don’t need to do any of that, look at how simple it is to update the welcome message on click of the button.
As soon as you start typing the name of a view from your layout file, Android Studio will offer auto complete and will automatically add the following static import for all the views in our layout file.
import kotlinx.android.synthetic.main.activity_main.*
Then this is all you need to add a listener to the button and change the welcome message on click. Don’t believe me? Run the app and see for yourself. Great right? No more findViewById() or even ButterKnife.
updateTextButton.setOnClickListener { welcomeTextView.text = "Hello Kotlin World!" }
This is a very simple example of how Kotlin can make your life much easier when building Android apps. I personally love ButterKnife and how you can with a simple plugin generate all your view bindings but this is even better. In an Activity/Fragment that has loads of views, with ButterKnife you’ll have a huge list of fields for each view declared on top and you still have to bind() and unbind() onCreate and onDestroy. This is much cleaner with much less boilerplate code.
And that’s it for the 1st article. We created a really basic Hello World app with Kotlin and then made some small changes to demonstrate the power of Kotlin for binding our layout views.
Hope you enjoyed this one and see you in playground number 2 for some Kotlin syntax basics.
NEXT ➡ Kotlin Syntax Part I — why am I excluded?