Joao Alves
Senior Engineering Manager at IndeedFlex
Writing UI Tests with Espresso and Kakao

Hi everyone, after completing 2 series of articles, I think now I’m going to write some individual ones for a change. The goal of an article every 2 weeks for 2018 remains, so expect more. But let’s jump into today’s one.
In the last article of my London Tube Status Series, I showed a very simple UI test for the main screen of the app using Espresso and Kakao. It was not very detailed, so I decided to write a bit more about it, hence this article.
What is Kakao?
But before writing some UI tests, we need to know what is Kakao and why and how it can help us writing UI tests with Espresso. Kakao is in essence, a Kotlin DSL for Espresso written by the Android team at Agoda. It was created to help them write UI tests faster and in a cleaner way, and also to make them more readable. In my opinion, it resulted quite well, so 👏 to them, but let’s see how it looks so you can decide for yourself.
Basic project
To show how Kakao works with Espresso we just need a very basic project so I created a new one on GitHub just for this. You can check all the code later but now I would just follow the article 😃.
Dependencies
Let’s go ahead and add the Kakao dependency to the project. Espresso dependency is already added by default when we create a new project in Android Studio but we now need to explicitly add a dependency for the test rules as those were removed from espresso-core in the latest release. So, just add this 2 lines to your application level build.gradle file:
androidTestImplementation 'com.agoda.kakao:kakao:1.4.0'
androidTestImplementation 'com.android.support.test:rules:1.0.2'
Our screen
And that’s it, done. We have all the required dependencies. Now, let’s assume we have the following simple screen with 2 states:
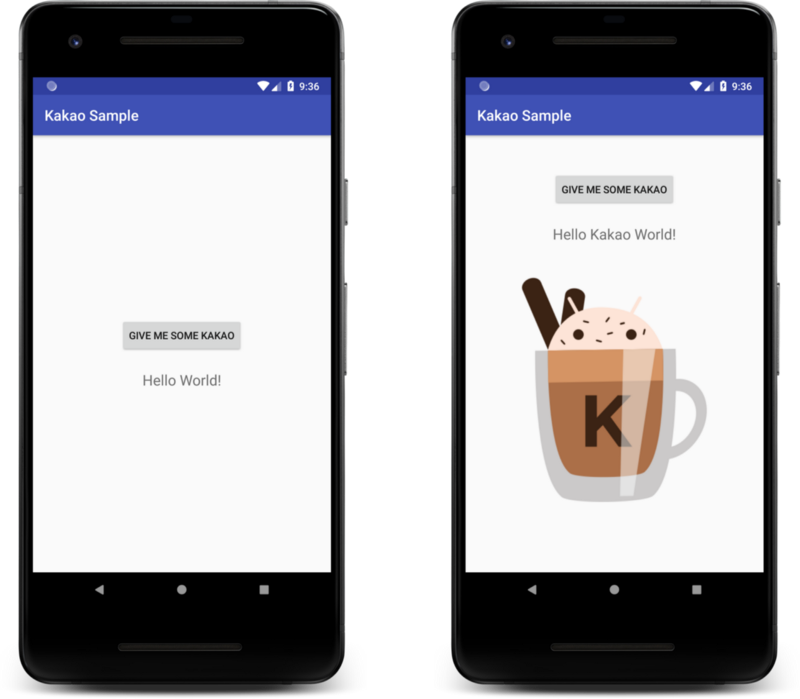
We want to test that both the button and the text view are on the screen to start with, and also, that the text gets updated to Hello Kakao World after we click the button. Also after clicking the button, our image view should be displayed. This is how our layout and activity classes look like:
class KakaoActivity : AppCompatActivity() {

    override fun onCreate(savedInstanceState: Bundle?) {
        super.onCreate(savedInstanceState)
        setContentView(R.layout.activity_kakao)

        button_update.setOnClickListener {
            text_view_hello.text = "Hello Kakao World!"
            image_view_kakao.visibility = View.VISIBLE
        }
    }
}
<?xml version="1.0" encoding="utf-8"?>
<LinearLayout xmlns:android="http://schemas.android.com/apk/res/android"
    xmlns:tools="http://schemas.android.com/tools"
    android:layout_width="match_parent"
    android:layout_height="match_parent"
    android:animateLayoutChanges="true"
    android:gravity="center"
    android:orientation="vertical"
    tools:context=".KakaoActivity">

    <Button
        android:id="@+id/button_update"
        android:layout_width="wrap_content"
        android:layout_height="wrap_content"
        android:text="Give me some Kakao" />

    <TextView
        android:id="@+id/text_view_hello"
        android:layout_width="wrap_content"
        android:layout_height="wrap_content"
        android:layout_marginTop="24dp"
        android:text="Hello World!"
        android:textSize="20sp" />


    <ImageView
        android:id="@+id/image_view_kakao"
        android:layout_width="256dp"
        android:layout_height="wrap_content"
        android:src="@drawable/kakao"
        android:visibility="gone" />

</LinearLayout>
Yeah I know, hardcoded strings and dimensions amongst other things. All to demonstrate how simple this example is meant to be 😃
Testing with Espresso
Let’s start with espresso and see how we would write these tests:
@RunWith(AndroidJUnit4::class)
class KakaoActivityEspressoTest {

    @JvmField
    @Rule
    val testRule = ActivityTestRule<KakaoActivity>(KakaoActivity::class.java)

    @Test
    fun initialViewsDisplayedProperly() {
        onView(withId(R.id.button_update)).check(matches(isDisplayed()))
        onView(withId(R.id.text_view_hello)).check(matches(isDisplayed()))
        onView(withId(R.id.image_view_kakao)).check(matches(not(isDisplayed())))
        onView(withId(R.id.text_view_hello))
            .check(matches(withText(containsString("Hello World!"))))
    }

    @Test
    fun textShouldBeUpdateAndImageDisplayedOnButtonClick() {
        onView(withId(R.id.button_update)).perform(click())
        onView(withId(R.id.image_view_kakao)).check(matches(isDisplayed()))
        onView(withId(R.id.text_view_hello))
            .check(matches(withText(containsString("Hello Kakao World!"))))
    }
}
This is a very simple example, and already we can see that this code is not very enjoyable to read, well it isn’t to write as well. Imagine how tedious this can become if you have real-life examples with multiple views and interactions.
Testing with Kakao
Moving on to Kakao, first, a quick introduction I also have in my other article, and I believe it’s important. As mentioned above, Kakao is just a Kotlin DSL to use with espresso, but it does make writing UI tests much easier and makes them much easier to read and understand as well. There are 2 main concepts in Kakao:
Screen: this is a class we create for the screen under test, and where we define the views from that screen that will be interacted during the tests.
KView: this as expected represent your screen view components, the ones that will be interacted during the tests.
With these 2 concepts in mind, let’s see how can we write our UI Tests using Kakao. Well, we can start by working exactly with these 2 concepts, let’s create our KakaoScreen class and define all the Kviews we want to test:
class KakaoScreen : Screen<KakaoScreen>() {

    val helloTextView: KTextView =
        KTextView { withId(R.id.text_view_hello) }

    val button: KButton =
        KButton { withId(R.id.button_update) }

    val imageView: KImageView =
        KImageView { withId(R.id.image_view_kakao) }
}
Easy, right? We have our KakaoScreen and references to our button, text view and image view. Now let’s write some tests, unleash the full power of Kakao DSL and see how it looks:
@RunWith(AndroidJUnit4::class)
class KakaoActivityKakaoTest {

    @JvmField
    @Rule
    val testRule = ActivityTestRule<KakaoActivity>(KakaoActivity::class.java)

    private val kakaoScreen = KakaoScreen()

    @Test
    fun initialViewsDisplayedProperly() {
        kakaoScreen {
            button { isDisplayed() }
            helloTextView {
                isDisplayed()
                hasText("Hello World!")
            }
            imageView { isNotDisplayed() }
        }
    }

    @Test
    fun textShouldBeUpdateAndImageDisplayedOnButtonClick() {
        kakaoScreen {
            button { click() }
            helloTextView {
                isDisplayed()
                hasText("Hello Kakao World!")
            }
            imageView { isDisplayed() }
        }
    }
}
Amazing, right? How much cleaner is this compared to the bare espresso example? So much easier to write, so much easier to read, what else can we hope for?
If your project a lot of UI tests and you feel the pain every time you have to go through them or write some new ones, definitely give Kakao a try. We started using this at Babylon and never went back. And again, thanks a lot to the Agoda Android team for releasing this, it’s really awesome.
And this is it for today. Hope this can help you improve your UI test suite. If you liked the article please give some 👏 and see you in 2 weeks for something new (not sure what yet 😃) 👋