Joao Alves
Senior Engineering Manager at IndeedFlex
Firebase Android Playground — Cloud Messaging
Index:
- Firebase Android Playground — setting up and Analytics
- Firebase Android Playground — Authentication
- Firebase Android Playground — Realtime Database
- Firebase Android Playground — Cloud Messaging
Hello everyone, welcome to article number 4 and last one on this Firebase Android Playground series. Today we’re going to look into Firebase Cloud Messaging and how we can use it to send messages to our app and trigger local notifications with them.
What is Firebase Cloud Messaging
Firebase Cloud Messaging, as per the official website, is a cross-platform messaging solution that lets you reliably deliver messages at no cost. It allows us to deliver messages both to our users (via notifications) or directly to our app to trigger whatever actions we have in our code.
Because it’s part of the Firebase family, it can take full advantage of the analytics data to identify our users and their devices and properties. This results in really powerful targeting capabilities for the messages.
And if using the mobile SDK we can also send messages from the client, not just receive them. A bit of crazy idea but we could build a chat app with this.
Prepare the app
Enough introduction, time to work. Once again, the plan is to build something really simple, no UI involved. We’re just going to trigger a couple of messages using the Firebase Cloud Messaging service and see how we receive them in the app and read the data payload. Dependencies first as we all know, we just need to add the following line to our application level build.gradle script:
implementation 'com.google.firebase:firebase-messaging:17.0.0'
Then the first thing we need to do be able to receive messages when the app is foreground, and actually read the content of those messages, is to create our own FirebasePlaygroundMessagingService class that needs to extend the FCM FirebaseMessagingService class. This is also required if we want to send upstream messages, but we’re not looking into this on this article.
class FirebasePlaygroundMessagingService: FirebaseMessagingService() {

    override fun onMessageReceived(remoteMessage: RemoteMessage?) {
        super.onMessageReceived(remoteMessage)
        createNotificationChannel()
        remoteMessage?.let {
            val customMessage = it.data.getValue(CUSTOM_KEY)
            val title = it.notification?.title?: "Backup title"
            val message = it.notification?.body?: "Backup message"
            sendNotification(title, "$message and $customMessage")
        }
    }

    companion object {
        const val CHANNEL_ID = "firebase_playground_channel_id"
        const val CUSTOM_KEY = "custom_key"
    }
}
For our example all we need to do is to override the onMessageReceived function. As you can see, we can access the data from the message and extract any custom data we setup in the payload. In this case we’re getting the text we’ll define later when adding a custom key on our message payload. Then we’re just combining with the actual notification body and using it to create a local notification.
Pretty simple, right? I left the notification and notification channel creation code out of the snippet for brevity, you can check it on the repo, but it’s standard code to create a notification. The only remaining bit, it to add our service to the AndroidManifest.xml file as follows:
<service android:name=".cloudmessaging.FirebasePlaygroundMessagingService">
    <intent-filter>
        <action android:name="com.google.firebase.MESSAGING_EVENT" />
    </intent-filter>
</service>
Testing the app
And that above, it’s all we need to do in order to start receiving messages in our app. We can obviously go into more detail to setup notification channels but for our example we’ll just use the default one so no need to add any code. Let’s see how to send some messages using the Notification Composer inside the Firebase Console.
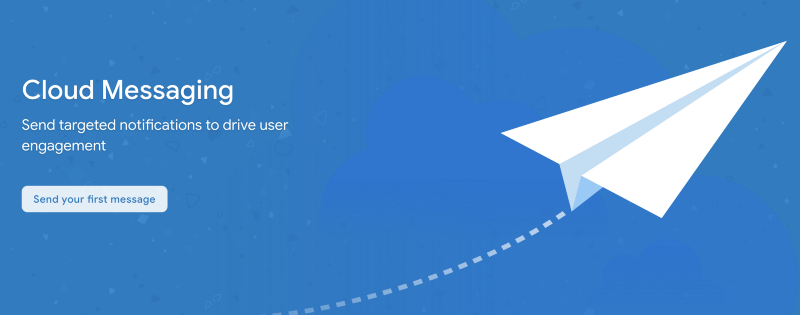
Open the console, and on the left hand side select the Cloud Messaging option inside the Grow section, you should see something like this on the screen:
Let’s go ahead and just tap that button to send our first message. Now we should see the Composer where we can compose/create our notification. I’ll add a screenshot for the important parts and leave the others out:
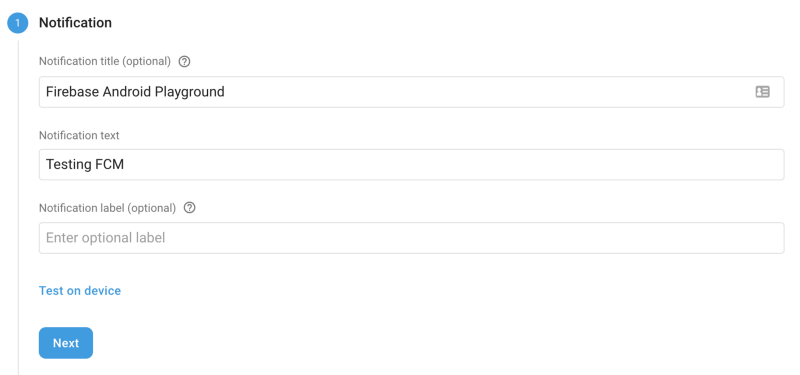
On the 1st section we just set a title and a content for our notification can click next.
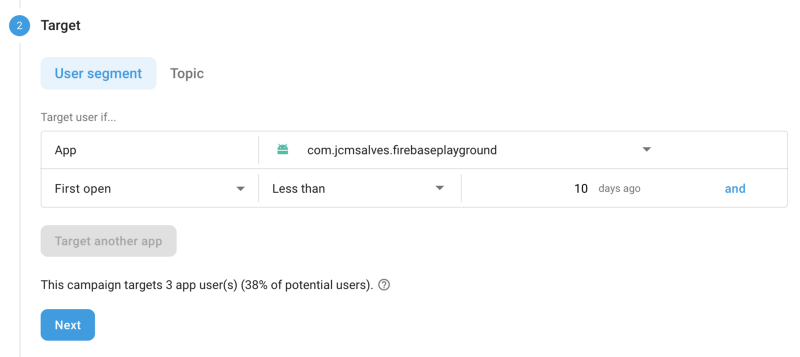
On the target section, we could just pick our app and we would be good to go. But if you look at the image you can see how I’m adding a second target rule for this message. If you explore this section further, there are several options available, including targeting users with specific values for a user property for example.
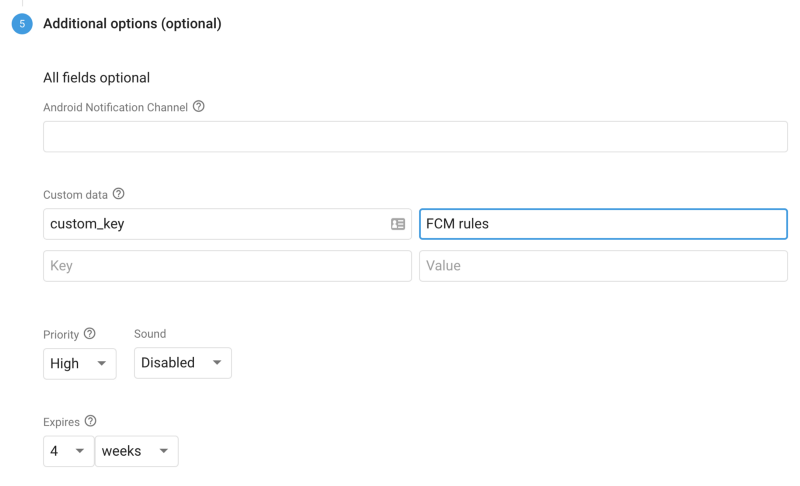
I skipped the scheduling section, because we want to test this now we just leave it as it is by default, and I also skipped the Conversion events section as we won’t talk about that in the article. In the Additional option section is where we need to add the custom data we were parsing in the code before. So, we just add the same key we defined in the code and some extra text to display in the notification we’ll trigger with the message.
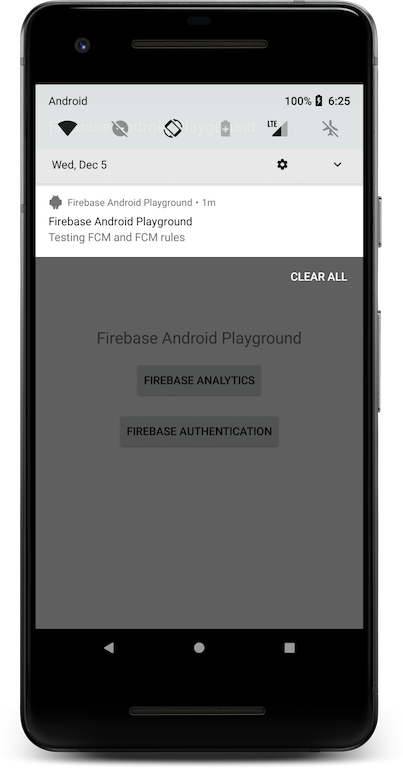
And that’s it we’re ready to go. Just tap the publish button and you should now have a new push notification on your device. With the above, this is how it looks:
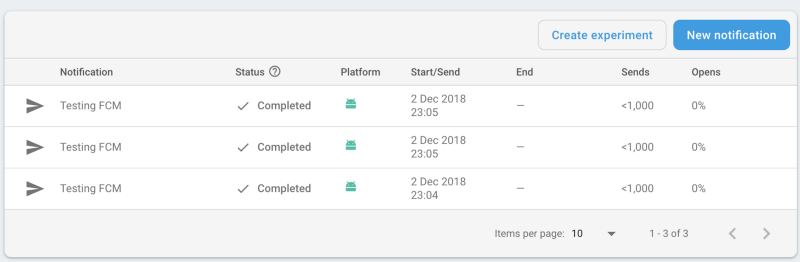
If you want to see all your messages sent, the Cloud Messaging section of the console should now look more like this, with your sent notifications list:
I’m not going to get into much details, but if you tap and explore the Create Experiment button you’ll see how easy it is to do some A/B testing with push notifications and measure for example which text on the message triggers more notification opens. This assuming you use the text defined in the FCM message when creating the push, we’re changing it for the purpose of the sample.
And that’s it for today and for this series, a small one to finish. I hadn’t used Firebase before properly and this series allowed me to explore some of its core functionalities. Hope you enjoyed this article and the rest of the series and if you did, please don’t forget to give some 👏 and see you in a couple of weeks for my last article of the year 👋.
Firebase Android Playground — Realtime Database ⇦ PREVIOUS